
If you’re a chocolate lover, then these rocky road brownies are your dream come true. Packed with rich chocolate flavor, gooey marshmallows, and crunchy nuts, this recipe is a delightful twist on traditional brownies. Perfect for sharing at gatherings or indulging in on your own, these brownies are guaranteed to satisfy your sweet tooth.
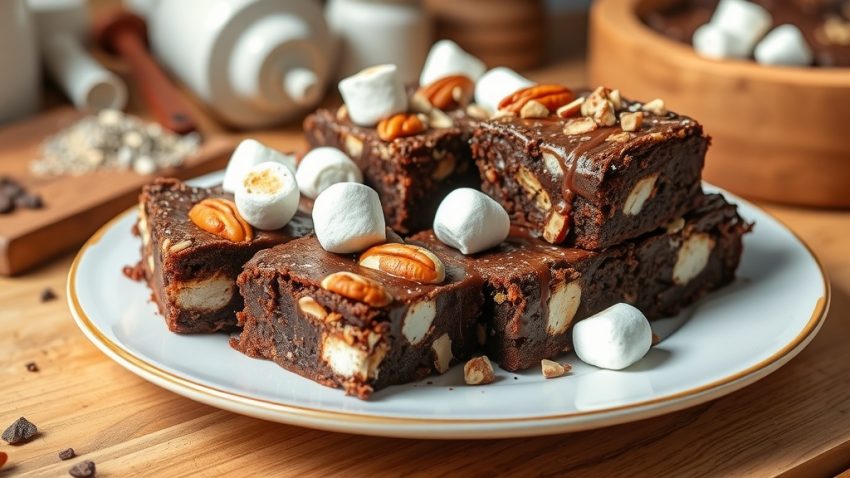
Imagine biting into a fudgy brownie, only to discover layers of fluffy marshmallows and crunchy walnuts within. The combination of textures makes every bite an adventure. Whether you’re watching a movie or hosting a party, these brownies will steal the show and leave everyone asking for the recipe.
Easy to make and utterly delicious, these rocky road brownies are sure to become a favorite in your dessert repertoire. Just grab a few simple ingredients, and you’ll be on your way to a chocolatey delight that everyone will adore.
Exploring the Delight of Rocky Road Brownies
Rocky road brownies are a chocolate lover’s fantasy, combining rich, fudgy goodness with the irresistible textures of marshmallows and nuts. These treats are not just desserts; they are an experience that evokes warmth and comfort.
The unique layering of gooey marshmallows and crunchy nuts adds a delightful contrast to the dense brownie base. Each square reveals a melty heart that keeps you coming back for more. Ideal for gatherings or simply for a cozy evening at home, these brownies are sure to impress.
Preparation: A Simple Journey
Making rocky road brownies is straightforward and doesn’t require advanced baking skills. The process begins with common kitchen staples like butter, sugar, eggs, and cocoa powder. These ingredients come together to form a base that is both rich and satisfying.
Once the wet and dry ingredients are combined, the addition of nuts and optional chocolate chips enhances the brownie’s flavor profile. The magic happens when the batter is baked, filling your kitchen with an inviting aroma that signals something delicious is on the way.
The Perfect Finish
The final touch is what makes these brownies truly special. After baking, a sprinkle of mini marshmallows on top transforms them from ordinary to extraordinary. A quick return to the oven allows the marshmallows to soften, creating a fluffy layer that beautifully contrasts the dense brownie.
Allowing the brownies to cool before cutting is essential for achieving those perfect squares. Each slice reveals a gooey interior, inviting everyone to take a bite.
Serving Suggestions and Pairings
These decadent brownies can be served warm, perhaps with a scoop of vanilla ice cream or a drizzle of chocolate sauce for an added treat. They also pair excellently with a cup of coffee or a glass of milk, making them versatile for any occasion.
For a more festive touch, consider adding crushed peppermint or a sprinkle of sea salt on top before serving. These variations can elevate the flavors and provide a delightful surprise to your guests.
Storage Tips
To keep your brownies fresh, store them in an airtight container at room temperature. They can last for several days, although they are likely to disappear much sooner!
If you want to extend their shelf life, consider freezing them. Wrap the brownies tightly in plastic wrap and then place them in a freezer-safe container. They can be enjoyed even weeks later, though the chewy texture is often best enjoyed fresh.
The Cozy Kitchen Vibe
The setting in which you prepare and enjoy these brownies adds to the experience. A warm, inviting kitchen filled with baking tools and the sweet smell of chocolate creates a cozy atmosphere. Whether you’re baking solo or with loved ones, the process of making rocky road brownies is sure to foster connections.
With their rich flavors and tempting textures, these brownies are not just a dessert; they are a delightful way to bring people together and create lasting memories around the table.
The Ultimate Rocky Road Brownies

These rocky road brownies are rich, fudgy, and loaded with chocolate flavor. The addition of marshmallows and nuts creates a delightful contrast in texture, making each bite a melt-in-your-mouth experience.
Ingredients
- 1 cup unsalted butter, melted
- 2 cups granulated sugar
- 4 large eggs
- 1 teaspoon vanilla extract
- 1 cup all-purpose flour
- 1 cup unsweetened cocoa powder
- 1/2 teaspoon salt
- 1 cup chopped walnuts or almonds
- 1 cup mini marshmallows
- 1/2 cup chocolate chips (optional)
Instructions
- Preheat the Oven: Preheat your oven to 350°F (175°C) and grease a 9×13 inch baking pan.
- Mix Wet Ingredients: In a large bowl, combine the melted butter and sugar. Stir until well combined, then add the eggs and vanilla extract, mixing until smooth.
- Combine Dry Ingredients: In another bowl, whisk together the flour, cocoa powder, and salt. Gradually add this mixture to the wet ingredients, stirring until just combined. Be careful not to overmix.
- Add Mix-ins: Fold in the chopped nuts and chocolate chips, if using, until evenly distributed.
- Bake: Pour the brownie batter into the prepared baking pan, spreading it evenly. Bake in the preheated oven for about 25-30 minutes, or until a toothpick inserted in the center comes out with a few moist crumbs.
- Add Marshmallows: Remove the brownies from the oven and immediately sprinkle the mini marshmallows on top. Return to the oven for an additional 5 minutes to allow the marshmallows to soften.
- Cool and Serve: Let the brownies cool in the pan before cutting them into squares. Serve and enjoy your delicious rocky road brownies!
Cook and Prep Times
- Prep Time: 15 minutes
- Cook Time: 35 minutes
- Total Time: 50 minutes
Nutrition Information
- Servings: 12 brownies
- Calories: 290kcal
- Fat: 14g
- Protein: 4g
- Carbohydrates: 40g
✔️ Mixing Bowls – One large and one medium for wet and dry ingredients
✔️ Electric Mixer (Hand or Stand Mixer) – For creaming butter and sugar
✔️ Measuring Cups & Spoons – To measure ingredients accurately
✔️ Sifter (Optional) – Helps aerate flour for a smoother dough
Cookie Preparation Tools
✔️ Rolling Pin – To roll out the dough evenly
✔️ Heart-Shaped Cookie Cutter – To cut perfect heart shapes
✔️ Parchment Paper or Silicone Baking Mat – Prevents cookies from sticking
✔️ Baking Sheet (Cookie Tray) – To bake the cookies evenly
✔️ Wire Cooling Rack – Allows cookies to cool properly before decorating
Decorating Tools
✔️ Piping Bags & Tips – For applying royal icing or buttercream
✔️ Offset Spatula or Butter Knife – To spread icing smoothly
✔️ Sprinkle Shakers – For adding sprinkles or edible glitter